Last Thanksgiving, I watched my cousin attempt her first apple pie. She confidently dumped raw apple slices into a store-bought crust, baked it, and wondered why it turned into a soggy mess with a crater where the filling should be.
That’s when I realized most people are missing the secret to perfect apple pie—it’s not just about tossing fruit in a pan and hoping for the best.
This recipe fixes all those classic apple pie disasters. The filling stays put, the crust stays crisp, and you get those beautiful, tender apple slices that don’t disappear into mush.
Plus, I’ve added a game-changing pre-cooking step that transforms good pie into absolutely incredible pie.
Why You’ll Love This Homemade Apple Pie
- No soggy disasters
- Crispy bottom crust
- Make-ahead friendl
Homemade Apple Pie Recipe
| Ingredient | Amount |
| Thinly sliced apples (1/4-inch) | 10 cups (7-8 large apples) |
| Packed light brown sugar | 1/2 cup |
| All-purpose flour, spooned and leveled | 4 tablespoons |
| Fresh lemon juice | 1 tablespoon |
| Ground cinnamon | 1 1/2 teaspoons |
| Ground nutmeg | 1/4 teaspoon |
| Ground ginger | 1/4 teaspoon |
| Double pie crust | 1 recipe (homemade or store-bought) |
| Large egg | 1, for egg wash |
| Heavy cream | 1 tablespoon, for egg wash |
| Turbinado sugar for sprinkling | Optional |
Step-by-Step Instructions
Step 1: Prep Your Pie Crust
Start with your pie dough chilled for at least 2 hours. On a floured surface, roll out one disc into a 12-inch circle, turning it a quarter turn every few rolls. Gently transfer to your 9-inch pie dish and tuck it in without stretching. Pop it back in the fridge while you make the filling.
Step 2: Create the Perfect Filling Mix
In a large bowl, toss those apple slices with brown sugar, flour, lemon juice, cinnamon, nutmeg, and ginger. Mix it thoroughly—every slice should be coated.
Step 3: The Game-Changing Pre-Cook
Here’s where most recipes go wrong—they skip this step. Pour your apple mixture into a large skillet or Dutch oven and cook over medium heat for about 5 minutes, stirring gently. The apples should just start to soften. This prevents the dreaded pie crater and makes the filling incredibly flavorful. Let it cool slightly while you preheat your oven to 400°F.
Step 4: Assemble Your Masterpiece
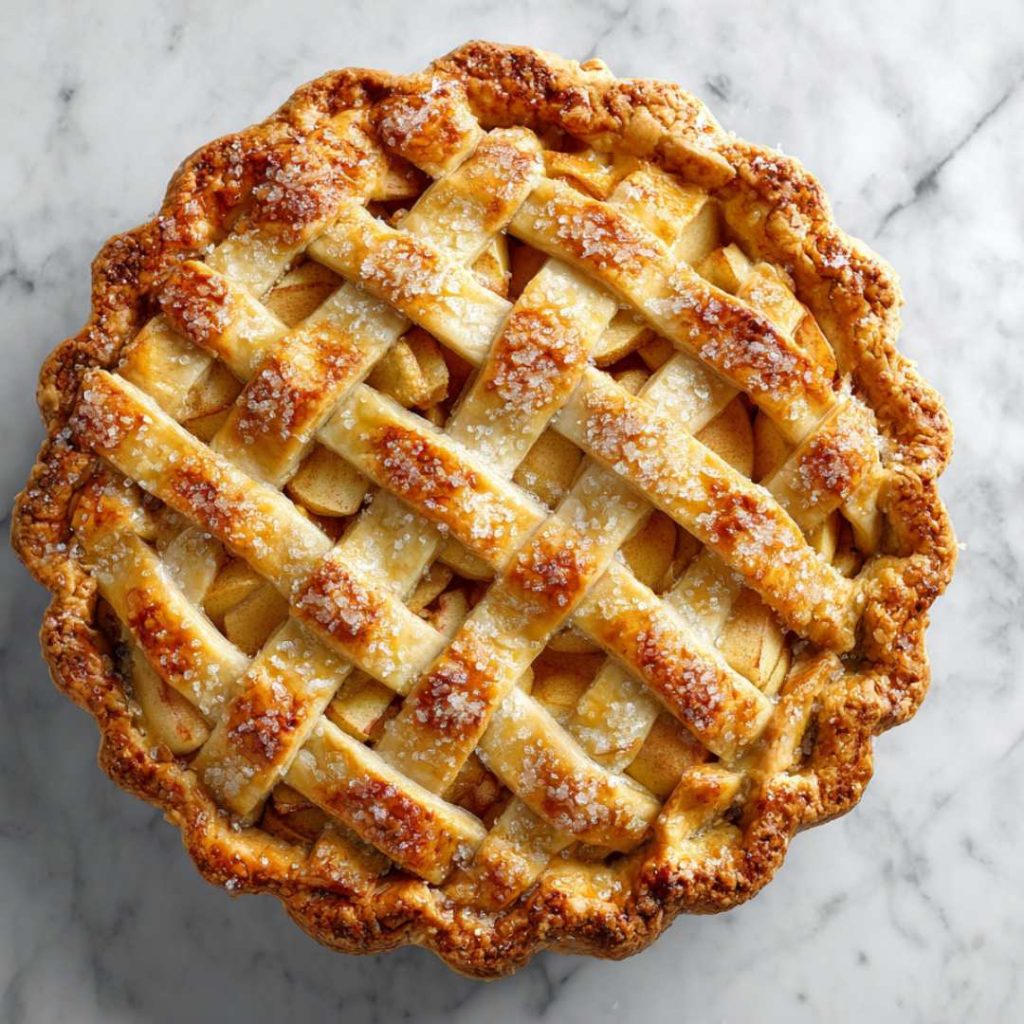
Roll out your second dough disc into a 12-inch circle. Spoon that slightly warm filling into your chilled crust—yes, it’ll look like Mount Apple, but that’s exactly right. For the top, you can do a full crust with vents, but I love a lattice for that bakery look. Cut 1-inch strips and weave them over and under each other. Trim excess dough and crimp those edges to seal everything together.
Step 5: The Perfect Finish
Whisk your egg with heavy cream (richer than milk!) and brush it over the crust. Sprinkle with turbinado sugar if you want that professional sparkle. Pro tip: chill the assembled pie for 20-30 minutes to help the lattice hold its shape.
Step 6: Bake Like a Pro
Place a baking sheet on the bottom rack to catch drips. Bake for 25 minutes, then reduce to 375°F and add a pie shield to protect those edges. Continue baking 35-45 minutes until golden and bubbling. The filling should hit 200°F if you’re being precise.
Step 7: Cooling
Cool for at least 3 hours before cutting. I know it’s torture, but warm pie filling is basically apple soup. Your patience will be rewarded with perfect slices that actually hold together.
Tips, Variations & Customizations
Apple Selection: Mix tart and sweet varieties. Granny Smith + Honeycrisp is my go-to combo, but Braeburn and Gala work beautifully too.
Spice It Up: Add a pinch of cardamom for something special, or swap the ginger for allspice if you prefer traditional flavors.
Texture Play: Toss in a handful of dried cranberries or chopped walnuts with the filling for extra interest.
Crust Alternatives: Not feeling lattice? A simple top crust with decorative vents works perfectly. Cut out small apple shapes for Instagram-worthy charm.
Ingredient Swaps & Substitutions
No brown sugar? Use white sugar plus 1 tablespoon molasses, or substitute with coconut sugar for the same depth.
Fresh ginger instead of ground: Use 1/2 teaspoon freshly grated—it’s more intense, so start small.
Dairy-free egg wash: Brush with oat milk or almond milk mixed with a touch of maple syrup.
Gluten-free flour: Replace the 3 tablespoons with cornstarch or arrowroot powder for thickening.
No heavy cream for wash: Whole milk works fine, or even just beaten egg by itself.
Storage & Make-Ahead Guide
Room Temperature: Keeps perfectly for 24 hours covered with a clean kitchen towel—plastic wrap makes the crust soggy.
Refrigerator: Up to 5 days covered. Bring to room temp before serving or warm individual slices in a 300°F oven for 5 minutes.
Freezer: Wrap tightly and freeze for up to 3 months. Thaw overnight in the fridge.
Make-Ahead Magic: Assemble completely and freeze unbaked for up to 1 month. Bake from frozen, adding 15-20 extra minutes to the total time.
Best Storage: Glass or ceramic pie plates work better than metal for storing—less metallic taste transfer.
Nutritional Breakdown
Per Serving (10 slices total):
| Nutrient | Amount |
| Calories | 285 |
| Total Fat | 12g |
| Saturated Fat | 6g |
| Cholesterol | 35mg |
| Sodium | 190mg |
| Total Carbs | 45g |
| Dietary Fiber | 3g |
| Sugars | 22g |
| Protein | 3g |
Serving Suggestions
- Classic: Warm slice with vanilla ice cream melting on top
- Fancy: Drizzle with salted caramel sauce and a dollop of whipped cream
- Breakfast vibes: Cold slice with your morning coffee—don’t judge
- Holiday style: Serve with a wedge of sharp cheddar cheese (surprisingly amazing)
- Make it special: Dust with cinnamon and serve with bourbon whipped cream
Frequently Asked Questions
Why did my pie filling bubble over?
Usually this means your oven temperature is too high or you skipped the pre-cooking step. The pre-cook helps control moisture and prevents volcanic eruptions.
Can I use frozen apples?
Fresh is always better, but if using frozen, thaw and drain them first. Add an extra tablespoon of flour to account for extra moisture.
How do I know when it’s done?
The crust should be golden brown and the filling should bubble actively through the vents or lattice. If you’re unsure, an instant-read thermometer should read 200°F in the center.
Why is my bottom crust soggy?
Pre-baking (blind baking) the bottom crust for 10 minutes before adding filling helps. Also, make sure your oven is fully preheated and consider baking on a lower rack.
Final Words
There’s something magical about pulling a golden, bubbling apple pie from your oven—the smell alone will have neighbors mysteriously appearing at your door. This isn’t just dessert; it’s edible comfort, family tradition, and pure autumn joy all wrapped in a flaky crust.
Make this tonight, and tomorrow-you will definitely thank yourself. Your kitchen will smell like heaven, your family will think you’re a baking genius, and you’ll have mastered the art of perfect apple pie. Plus, now you’ll be the one helping confused cousins at Thanksgiving—and trust me, that’s a pretty great feeling.