I love cheesecake, but sometimes I just don’t have the patience to bake one. I know baking can be therapeutic, but sometimes, you just need a dessert that’s effortless yet impressive.
That’s exactly what these No-Bake Chocolate Cheesecake Bars deliver!
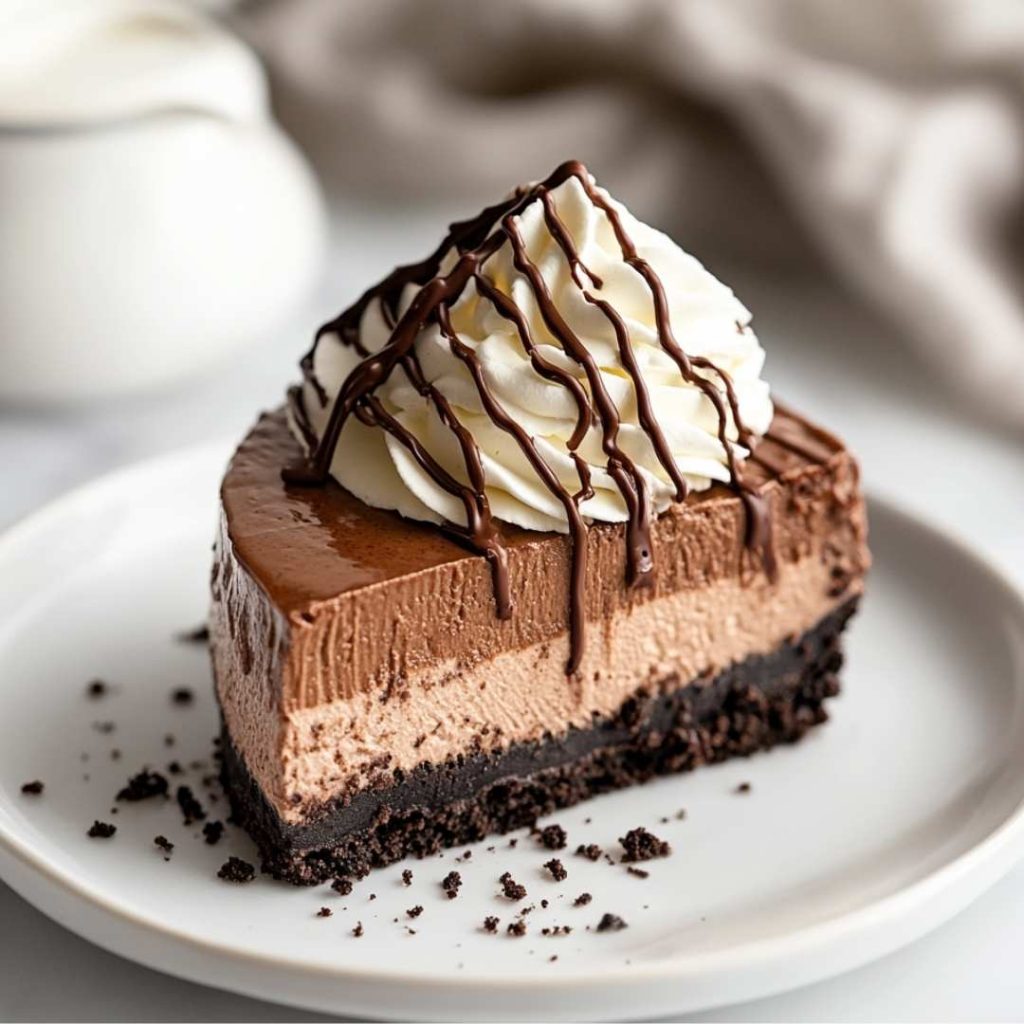
I first made these when I needed a quick yet impressive treat for a last-minute gathering, and let me tell you, they disappeared within minutes. The silky, rich chocolate cheesecake filling, now with a luxurious chocolate ganache layer, sits atop a buttery Oreo crust, making each bite an indulgence.
If you’re a chocolate lover (or just a dessert enthusiast), you need this in your life!
Why You’ll Love These No-Bake Cheesecake Bars
- Rich, creamy texture
- Chocolate overload
- Make-ahead friendly
- Perfect for any occasion
No-Bake Chocolate Cheesecake Bars Recipe
Ingredients:
| Ingredient | Amount |
|---|---|
| Cream cheese | 10 oz |
| Semi-sweet chocolate (filling) | 8 oz |
| Heavy whipping cream (filling) | 1 cup |
| Powdered sugar | 2/3 cup |
| Sour cream | 1/3 cup |
| Vanilla extract | 1 teaspoon |
| Semi-sweet chocolate (ganache) | 6 oz |
| Heavy cream (ganache) | 1/4 cup |
| Oreo crumbs | 1 1/2 cups |
| Unsalted butter | 1/2 cup |
Optional Add-ons
- Chocolate chips – Sprinkle on top for extra crunch and texture.
- Sea salt – A pinch on top enhances the chocolate flavors.
- Crushed nuts – Adds a bit of crunch for those who love a nutty bite.
- Whipped cream – For a dollop on top, as seen in the image, with a drizzle of melted chocolate.
Tools You’ll Need
- Mixing bowls
- Electric mixer
- Spatula
- 9×9 baking dish
- Parchment paper
- Measuring cups and spoons
Step-by-Step Instructions
Step 1: Prepare the Oreo Crust
Crush the Oreo cookies into fine crumbs using a food processor or by placing them in a sealed bag and smashing them with a rolling pin. Melt the butter in a small saucepan or microwave until fully liquefied. Pour the melted butter over the Oreo crumbs and stir until the mixture resembles wet sand.
Press the mixture firmly into the bottom of a parchment-lined 9×9-inch baking dish, using the back of a spoon or a flat-bottomed glass to create an even layer. Place it in the refrigerator to set while you prepare the filling.
Step 2: Melt the Chocolate for the Cheesecake Filling
Chop the 8 oz of semi-sweet chocolate into small pieces and place them in a microwave-safe bowl. Microwave in 30-second intervals, stirring well after each round, until the chocolate is fully melted and smooth. Set it aside to cool slightly, so it’s not too hot before adding it to the filling to prevent curdling.
Step 3: Make the Cheesecake Filling
In a large mixing bowl, beat the cream cheese and powdered sugar with an electric mixer on medium speed until smooth and creamy. Add the sour cream, sweetened condensed milk, and vanilla extract, continuing to mix until fully combined. Slowly pour in the melted chocolate while mixing on low speed to ensure the filling remains smooth and lump-free.
Step 4: Whip the Cream and Combine
In a separate mixing bowl, whip the 1 cup of heavy whipping cream using an electric mixer until stiff peaks form. This will give the cheesecake filling a light, airy texture. Gently fold the whipped cream into the chocolate cheesecake mixture using a spatula, being careful not to overmix and deflate the whipped cream.
Step 5: Assemble the First Layer
Pour the cheesecake filling over the chilled Oreo crust, spreading it out evenly with a spatula. Smooth the top and place the dish back in the refrigerator to set for about 1 hour.
Step 6: Prepare the Chocolate Ganache Layer
Chop the 6 oz of semi-sweet chocolate into small pieces and place them in a heatproof bowl. Heat the 1/4 cup of heavy cream in a small saucepan over medium heat until it just begins to simmer (do not boil).
Pour the hot cream over the chopped chocolate and let it sit for 1-2 minutes. Stir until the mixture is smooth and glossy, creating a ganache. Let it cool slightly until it thickens but is still pourable.
Step 7: Add the Chocolate Ganache Layer
Pour the chocolate ganache over the chilled cheesecake layer, spreading it evenly with a spatula to create a smooth, glossy layer. Return the dish to the refrigerator and let it chill for at least 3 more hours, or overnight for best results.
Step 8: Final Touches and Serve
Once fully set, lift the cheesecake out of the dish using the parchment paper. Slice into bars. For the topping as shown in the image, whip additional heavy cream (about 1/2 cup) until stiff peaks form, and pipe or dollop it on top of each slice. Drizzle with melted chocolate for that final decadent touch. Serve chilled.
Best Paired With
- Fresh berries – A tart contrast to the rich chocolate flavor.
- Espresso or coffee – The bitterness balances out the sweetness.
- Vanilla ice cream – Because why not?
Storage and Serving
Store these cheesecake bars in an airtight container in the refrigerator for up to 5 days. For longer storage, freeze them in individual slices for up to 2 months.
Tips for Success
- Let the cream cheese soften before mixing to prevent lumps.
- Use high-quality chocolate for the best flavor.
- Don’t overmix the whipped cream into the cheesecake filling—it should stay light and fluffy.
- Ensure the ganache cools slightly before pouring to avoid melting the cheesecake layer.
Substitutes and Variations
- Use graham crackers instead of Oreos for a more traditional cheesecake base.
- Swap semi-sweet chocolate for dark chocolate for a richer taste.
- Make it dairy-free by using plant-based cream cheese, coconut cream, and dairy-free chocolate.
Nutritional Breakdown
| Nutrient | Amount (per bar) |
|---|---|
| Calories | 360 |
| Fat | 25g |
| Carbs | 30g |
| Protein | 4g |
What Others Are Saying About This Recipe
Princess H. – “I made these for a girls’ night in, and they were an absolute hit! So easy to make, and the chocolate flavor was incredible.”
Charlotte T. – “I’m not usually a cheesecake fan, but these bars changed my mind. Definitely making these again!”
Amara R. – “This recipe saved me when I needed a quick yet impressive dessert for a family dinner. 10/10!”
FAQs
Can I use milk chocolate instead of semi-sweet chocolate? Yes, but it will result in a sweeter cheesecake filling.
How long do these need to chill? A minimum of 4 hours (including the 1 hour for the first layer), but overnight is best for a firm set.
What’s the best way to cut them neatly? Use a sharp knife dipped in hot water and wipe clean between cuts.
Final Thoughts
Making these No-Bake Chocolate Cheesecake Bars has become a tradition in my home, whether it’s for a casual movie night or a special celebration. With the luxurious chocolate ganache layer, they’re even more indulgent, just like the stunning dessert in the image.
I love how simple they are to whip up, yet they feel like a luxurious treat every single time. If you give this recipe a try, I’d love to hear how it turns out for you—do you add your own twist? Let me know in the comments!